On a recent project we had the requirement to be able to link to large files which the user would be able to download, file sizes could be up to 2GB in size. Far too large to store in Sitecore Media Library, at least in database storage. We had previously used Blob storage in Azure with great success for another (non-Sitecore) site so decided to utilise this again but wanted a seamless, single interface for the user to work with, i.e. everything through Sitecore.
Knowing that Azure has a rich API set and pretty much everything in Sitecore can be hacked into via the pipelines we set on our merry journey.
The following requirements were set in order to help set the boundaries:
- any file uploaded to certain folders would be uploaded to Azure
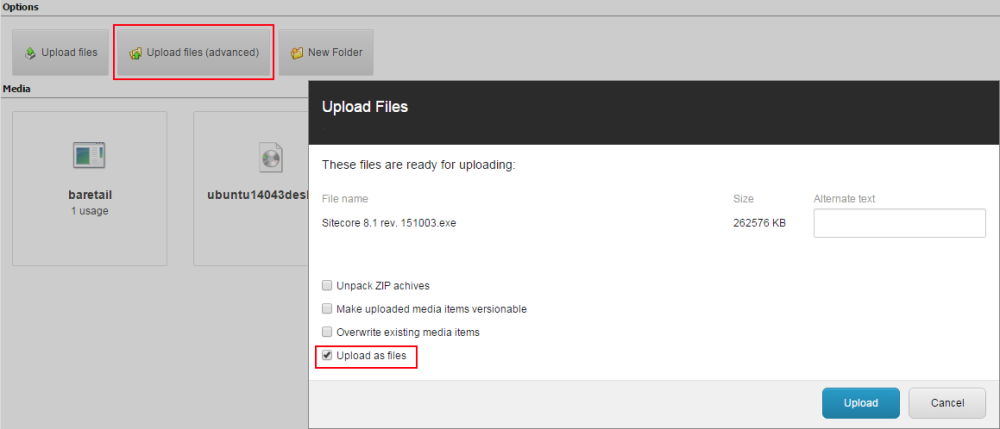
- any file uploaded and the “Upload as Files” option checked would be uploaded to Azure Blob Storage
There was also an additional requirement to automatically calculate the MD5 of each file which was uploaded. This ties in follows on nicely from my previous post about extending Media Item templates using Glass Mapper. Hopefully the specifics of that post will make more sense after this as well 🙂
- Part 1 – Uploading files to Cloud service
- Part 2 – Link Management
- Part 3 – File Attach handler
1. Ensure upload to specific folders are uploaded as files
This isn’t the exact requirement, but it will make sense in the next step.
Within the Media Library you can force “Upload as File” using the Advanced Upload dialog:
The dialog is also triggered automatically if you try to upload a file larger than the Media.MaxSizeInDatabase setting specified in config. By default this set to 500MB in Sitecore 8.
We wanted to utilise this functionality so that any large files that were uploaded would never be stored in the database, therefore unnecessarily add bloat for no additional benefit and we are still utilising native Sitecore dialogs which also provides the user with upload progress feedback (this was a requirement).
We added an additional pipeline to force the upload as file to specific folders:
using System.Collections.Generic;
using System.Linq;
using Sitecore.Data;
using Sitecore.Diagnostics;
using Sitecore.Pipelines.Upload;

namespace Sitecore.Custom.Pipelines
{
    /// <summary>
    /// Ensures media uploaded to specified folders is file based
    /// </summary>
    public class EnsureFileBasedMedia : UploadProcessor
    {
        public List<string> Config { get; private set; }

        public EnsureFileBasedMedia()
        {
            Config = new List<string>();
        }

        public void Process(UploadArgs args)
        {
            Assert.ArgumentNotNull(args, "args");

            if (args.Destination == UploadDestination.Database && EnsureUploadAsFile(args.Folder))
            {
                args.Destination = UploadDestination.File;
            }
        }

        /// <summary>
        /// Checks if passed in folder is configured to force upload as file
        /// </summary>
        /// <param name="folder">Location current item is being uploaded to</param>
        /// <returns>boolean</returns>
        private bool EnsureUploadAsFile(string folder)
        {
            Database db = Sitecore.Context.ContentDatabase ?? Sitecore.Context.Database;
            folder = db.GetItem(folder).Paths.FullPath.ToLower();

            return Config.Any(location => folder.StartsWith(location.ToLower()));
        }
    }
}
And the related config for this class:
<processors>
  <uiUpload>
    <processor type="Sitecore.Custom.Pipelines.EnsureFileBasedMedia, Sitecore.Custom" mode="on" patch:before="*[1]">
      <config hint="list">
        <location>/sitecore/media library/Files</location>
        <location>/sitecore/media library/Custom/Upload/Folders</location>
      </config>
    </processor>
  </uiUpload>
</processors>
Add as many folder locations as required.
Required Bug Fix
As you see the upload to Azure functionality will also work for any folder if the user manually selects the “Upload As Files” option. There is a bug in Sitecore 8 update-3 meaning the options selected in the dialog are not posted to the server (including the “Unpack ZIP Archives” option. You can request a fix by asking quoting Sitecore.Support.439231.
2. Using Sitecore Jobs to Trigger Custom Pipeline to Process Additional Tasks
Since we would be dealing with large files processing them may take some time along with the database bloat already mentioned, we decided not to use the approach from Tim Braga or Mark Servais and push the file at publish time. Instead we decided to immediately start processing the files as soon as they are uploaded.
We decided to create a custom pipeline which would allow us to add multiple processors to carry out each distinct task, and call the pipeline using a Sitecore Job. This is perfect for long running tasks and since it runs as a background tasks it is non-UI blocking:
using Sitecore.Diagnostics;
using Sitecore.Pipelines;
using Sitecore.Pipelines.Upload;

namespace Sitecore.Custom.Pipelines
{
    /// <summary>
    /// Processes file based media and calls custom pipeline to further process item
    /// </summary>
    public class ProcessMedia : UploadProcessor
    {
        public void Process(UploadArgs args)
        {
            Assert.ArgumentNotNull(args, "args");

            if (args.Destination == UploadDestination.File)
            {
                StartJob(args);
            }
        }

        /// <summary>
        /// Creates and starts a Sitecore Job to run as a long running background task
        /// </summary>
        /// <param name="args">The UploadArgs</param>
        public void StartJob(UploadArgs args)
        {
            var jobOptions = new Sitecore.Jobs.JobOptions("CustomMediaProcessor", "MediaProcessing",
                                                          Sitecore.Context.Site.Name,
                                                          this, "Run", new object[] { args });
            Sitecore.Jobs.JobManager.Start(jobOptions);
        }

        /// <summary>
        /// Calls Custom Pipeline with the supplied args
        /// </summary>
        /// <param name="args">The UploadArgs</param>
        public void Run(UploadArgs args)
        {
            CorePipeline.Run("custom.MediaProcessor", args);
        }
    }
}
And the related config for this processor:
<processors>
  <uiUpload>
    <processor type="Sitecore.Custom.Pipelines.ProcessMedia, Sitecore.Custom" mode="on"
               patch:after="*[@type='Sitecore.Pipelines.Upload.Save, Sitecore.Kernel']" />
  </uiUpload>
</processors>
3. Custom Pipeline to Process Upload to Azure and Additional Tasks
The definition of our pipeline is nothing special, it looks like any other pipeline and Sitecore themselves extensively use these types of pipelines themselves.
<pipelines>

  <!-- Custom Pipeline to Process Media Items -->
  <custom.MediaProcessor>
    <processor type="Sitecore.Custom.Pipelines.MediaProcessor.CalculateFileHash, Sitecore.Custom" />
    <processor type="Sitecore.Custom.Pipelines.MediaProcessor.UploadToCdn, Sitecore.Custom" />
  </custom.MediaProcessor>

</pipelines>
The pipeline specifies two processors, add or remove to suit your needs.
3.1. Calculating File MD5 Hash
This was the extension point we required for Glass Mapper from my previous post. We did not want to hassle users to calculate the MD5 hash of the file, but it would need to be displayed beside the file on the download page. This information belongs with the file hence the extension to the template.
using System.Diagnostics;
using System.Linq;
using Sitecire.Custom.Helpers;
using Sitecore.Data.Items;
using Sitecore.Diagnostics;
using Sitecore.Pipelines.Upload;
using Sitecore.SecurityModel;

namespace Sitecore.Custom.Pipelines.MediaProcessor
{
    /// <summary>
    /// Calculates MD5 hash of uploaded file and stores in media template
    /// </summary>
    public class CalculateFileHash
    {
        public void Process(UploadArgs args)
        {
            Assert.ArgumentNotNull(args, "args");
            var helper = new MediaHelper();

            foreach (Item file in args.UploadedItems.Where(file => file.Paths.IsMediaItem))
            {
                Profiler.StartOperation("Calculating MD5 hash for " + file.Paths.FullPath);

                using (new EditContext(file, SecurityCheck.Disable))
                {
                    file[IFileExtensionConstants.MD5HashFieldName] = helper.CalculateMd5((MediaItem)file);
                }

                Profiler.EndOperation();
            }
        }
    }
}
And the helper to calculate the MD5:
using System;
using System.Security.Cryptography;
using Sitecore.Data.Items;

public class MediaHelper
{
    public string CalculateMd5(MediaItem media)
    {
        byte[] hash;
        using (var md5 = MD5.Create())
        {
            using (var stream = media.GetMediaStream())
            {
                hash = md5.ComputeHash(stream);
            }
        }
        return BitConverter.ToString(hash).ToLower().Replace("-", string.Empty);
    }
}
3.2. Uploading to Azure Blob Storage
So far so good, but we still have not pushed the file into Azure. Our second processor deals with uploading the file from the server into Azure Blob storage.
using System.Linq;
using Sitecore.Custom.Custom.Helpers;
using Sitecore.Custom.Services.Interfaces;
using Sitecore.Custom.Services.Media;
using Sitecore.Data.Items;
using Sitecore.Diagnostics;
using Sitecore.Pipelines.Upload;
using Sitecore.SecurityModel;

namespace Sitecore.Custom.Pipelines.MediaProcessor
{
    /// <summary>
    /// Uploads media item to azure cloud storage
    /// </summary>
    public class UploadToCdn
    {
        ICloudStorage storage = new AzureStorage();
        MediaHelper helper = new MediaHelper();

        public void Process(UploadArgs args)
        {
            Assert.ArgumentNotNull(args, "args");

            foreach (Item file in args.UploadedItems.Where(file => file.Paths.IsMediaItem))
            {
                // upload to CDN
                string filename = storage.Put(file);

                // delete the existing file from disk
                helper.DeleteFile(file[FieldNameConstants.MediaItem.FilePath]);

                // update the item file location to CDN
                using (new EditContext(file, SecurityCheck.Disable))
                {
                    file[FieldNameConstants.MediaItem.FilePath] = filename;
                    file[IFileExtensionConstants.UploadedToCloudFieldName] = "1";
                }
            }
        }
    }
}
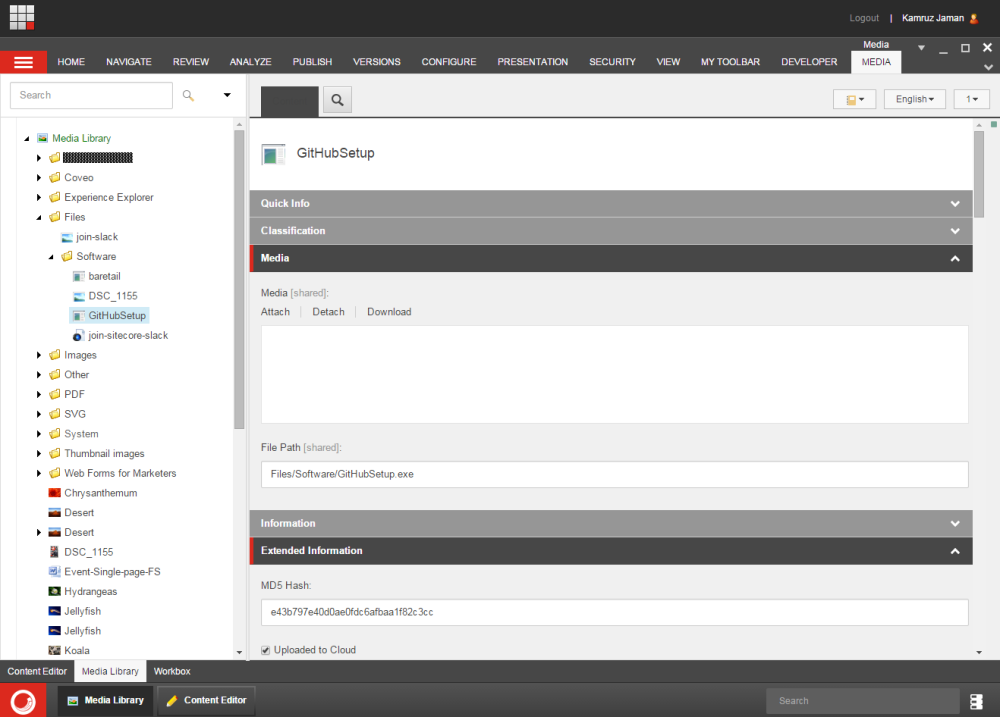
The above code will upload the file to Azure Blob Storage, delete the file from the server to free some space/clean up, and then update the File Path field on the media item to the location within our Azure Storage Container. Note that only the relative path is stored and not the entire URL to the Azure container.
We need to define the Cloud Storage provider. The implementation of the interface look like so:
using Sitecore.Data.Items;

namespace Sitecore.Custom.Services.Interfaces
{
    public interface ICloudStorage
    {
        string Put(MediaItem media);
        string Update(MediaItem media);
        bool Delete(string filename);
    }
}
The concrete Cloud Storage implementation for Azure looks like this:
using System.Configuration;
using System.Text.RegularExpressions;
using Sitecore.Custom.Services.Interfaces;
using Sitecore.Configuration;
using Sitecore.Data.Items;
using Sitecore.Diagnostics;
using Sitecore.Resources.Media;
using Sitecore.StringExtensions;
using Microsoft.WindowsAzure.Storage;
using Microsoft.WindowsAzure.Storage.Auth;
using Microsoft.WindowsAzure.Storage.Blob;

namespace Sitecore.Custom.Services.Media
{
    /// <summary>
    /// Uploads media items into Azure Blob storage container
    /// </summary>
    public class AzureStorage : ICloudStorage
    {
        private CloudBlobContainer blobContainer;

        #region ctor
        public AzureStorage() :
            this(ConfigurationManager.AppSettings[AppSettings.AzureStorageAccountName],
                 ConfigurationManager.AppSettings[AppSettings.AzureStorageAccountKey],
                 ConfigurationManager.AppSettings[AppSettings.AzureStorageContainer])
        {
        }

        public AzureStorage(string accountName, string accountKey, string container)
        {
            CloudStorageAccount storageAccount = new CloudStorageAccount(new StorageCredentials(accountName, accountKey), true);
            CloudBlobClient blobClient = storageAccount.CreateCloudBlobClient();
            blobContainer = blobClient.GetContainerReference(container);
        }
        #endregion

        #region Helper
        /// <summary>
        /// Extracts the filepath after the prefix link of the media item from the media url
        /// </summary>
        /// <param name="media">MediaItem</param>
        /// <returns>string filepath</returns>
        public string ParseMediaFileName(MediaItem media)
        {
            string filename = MediaManager.GetMediaUrl(media);

            Regex regex = new Regex(@"(?<={0}/).+".FormatWith(Settings.Media.MediaLinkPrefix));
            Match match = regex.Match(filename);
            if (match.Success)
                filename = match.Value;

            return filename;
        }
        #endregion

        #region Implementation
        public string Put(MediaItem media)
        {
            string filename = ParseMediaFileName(media);

            CloudBlockBlob blob = blobContainer.GetBlockBlobReference(filename);
            using (var fileStream = media.GetMediaStream())
            {
                blob.UploadFromStream(fileStream);
            }

            Log.Info("File successfully uploaded to Azure Blob Storage: " + filename , this);

            return filename;
        }

        public string Update(MediaItem media)
        {
            return Put(media);
        }

        public bool Delete(string filename)
        {
            CloudBlockBlob blob = blobContainer.GetBlockBlobReference(filename);
            return blob.DeleteIfExists();
        }
        #endregion
    }
}
We also need add the Azure settings to the AppSettings section of Web.config.
<appSettings>
  <!-- Media: Azure Cloud Storage -->
  <add key="Azure.StorageAccountName" value="jammykam" />
  <add key="Azure.StorageAccountKey" value="{replace-me}" />
  <add key="Azure.StorageContainer" value="test" />
  <add key="Azure.StorageUrl" value="https://jammykam.blob.core.windows.net/test" />
</appSettings>
There’s nothing too clever going on here either, mostly the code interacts with the Azure API, just add the Windows Azure Storage nuget package by Microsoft to your project.
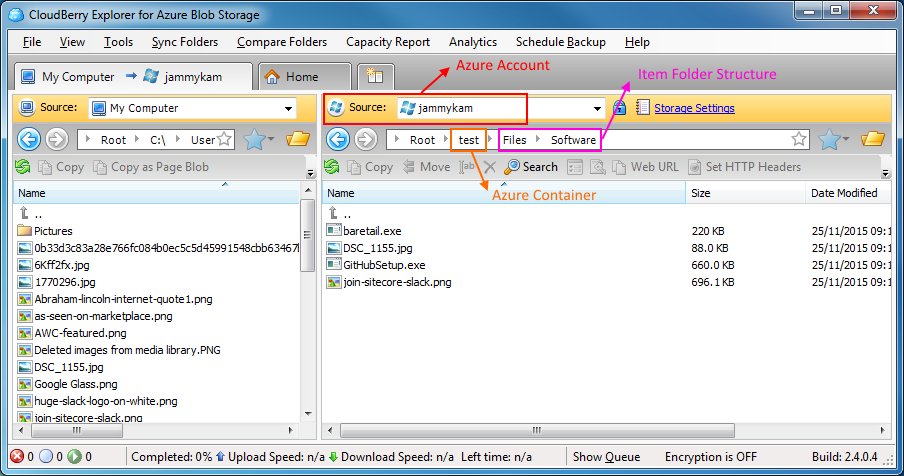
Azure Blob Storage does not have the concept of folders, so there is no need to create folder structures. Instead simply name your file with the dividing / included and they are kept to mimic folder paths. If you use a client side tool like Cloudberry Explorer then it will respect that folder structure and open in folders as you would expect it to in a normal file system.
3.3. Deleting Files from Azure Blob Storage
We can handle the deletes by adding a handler to the item:deleting event and calling the Delete method passing in the file name:
using System;
using Sitecore.Data.Items;
using Sitecore.Diagnostics;
using Sitecore.Events;

namespace Sitecore.Custom.Events
{
    public class MediaItemDeleting
    {
        public void OnItemDeleting(object sender, EventArgs args)
        {
            Assert.ArgumentNotNull(sender, "sender");
            Assert.ArgumentNotNull(args, "args");

            Item item = Event.ExtractParameter(args, 0) as Item;
            DeleteAzureMediaBlob(item);
        }

        private void DeleteAzureMediaBlob(Item item)
        {
            if (!item.Paths.IsMediaItem)
                return;

            var media = new MediaItem(item);
            if (media.FileBased)
            {
                ICloudStorage storage = new AzureStorage();
                string filename = item[FieldNameConstants.MediaItem.FilePath];
                storage.Delete(filename);
            }
        }
    }
}
And again patch in the handler:
<events>
  <event name="item:deleting">
    <handler type="Sitecore.Custom.Events.MediaItemDeleting, Sitecore.Custom" method="OnItemDeleting"/>
  </event>
</events>
And that’s it, our files have been pushed up into our Azure Blob Storage container.
The second part of the blog post will go into the code updates needed in order to link to the media.
Additional Reading
- A Sitecore CDN Integration Approach by Mark Servais
- Integrating a CDN into your Sitecore Solution by Tim Braga


Very nice. This will definitely come in handy
More on the way in part 2… hopefully solve some common issue as well.
I didn’t see it in Part #1 of your article but maybe its in your upcoming part #2. What if a content author deletes a media library item? Does your code handle purging files off of Azure storage? Also, what if the media library item has different language/region versions? Does your code account for that?
Hi Mike,
Yes it does handles deletes, the `AzureStorage` class includes a Delete method. For some reason I did not include the code but I have updated the post with the relevant code.
As for versioned media, no it does not handle it, I mentioned it at the very end of part 2. But I think it could be extended quite simply by adding the language/version into the file path when uploading to Azure by checking if versioned in the `ParseMediaFileName()` method. Note that the `item:deleting` method would need to be updated to delete all versions from Azure, as well as possibly `item:versionRemoving`. I’d need to check what happens when a new version is added, how to handle the upload of the file in that case. I think I’ve figured out the code required for the `Attach File` button within the template, will take me a few days to write it up though but that should handle it.
I can look into it and update the code if you think it would be useful.
Hey jammykam, the changes aren’t for me, I’m just being the devils advocate. I’m just trying to help you get from having a decent blog post from good to great. This post also has a similar design pattern for CDNs in general such as Akamai NetStorage. Having code that can create, update delete, and work in a Sitecore workflow process(don’t want to expose a file to the public in a premature way right?!) on a CDN such as Azure is a solution everyone will be looking for. Make sense?
Hey Mike. Thanks and I appreciate the feedback. I had designed the code to be changeable for any CDN, hence the use of the custom pipelines so it is very simple to change out for any other provider. I’ll follow up with some additional posts, my original reason for the code is more than met so everything else has been a bonus. I have put _some_ thought into these and have already solved the Attach file issue. I’ll extend with versioned media support as well since it is important and should be fairly straight forward… I hadn’t actually thought about Workflow so a very good point. That’ll need a bit more investigation 🙂 Keep an eye out, more to come later. Thanks.
Hi Mike , Rally nice post. Could you please suggest,will the same pipeline will trigger if
1.Images are uploaded through Sitecore PKG
2.Images already uploaded as a blob and we changes it to file via c# code.
Who’s Mike? 🙂
The answer is No to both of these, the pipelines triggers are via “uiUpload” and “attachFile”. I’m sure it would be possible to do, but you’d need to extend the code.